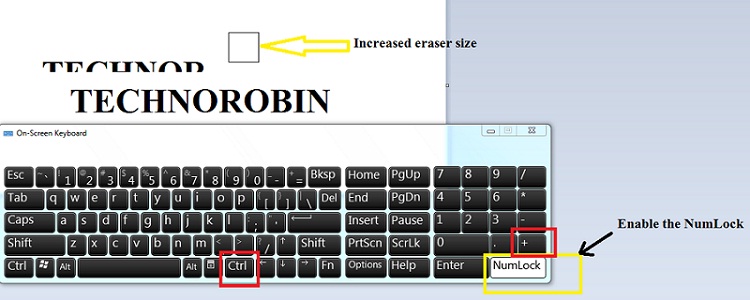
When editing images in Microsoft Paint, sometimes the default eraser size just doesn’t cut it — especially when you need to remove large portions quickly. Luckily, there are a couple of easy ways to increase the eraser size and make your editing faster and more efficient. Here's how you can do it!
🧐 Why Increase the Eraser Size?
The default eraser in MS Paint is quite small, which makes it slow and tedious when you need to erase large sections of an image. Unfortunately, Paint doesn’t offer an obvious slider or size control, but there are two easy workarounds you can use.
✅ Method 1: Using a Numeric Keypad
Requirements: A keyboard with a numeric keypad.
- Open MS Paint and select the Eraser tool.
- Now press and hold Ctrl + + key (from the numeric keypad) to increase the eraser size.
- To reduce the eraser size, press Ctrl + -.
Note: This method works only if your keyboard has a dedicated numeric keypad.
🖥️ Method 2: Using On-Screen Keyboard (For Laptops/Compact Keyboards)
If your device doesn’t have a numeric keypad, you can use the On-Screen Keyboard (OSK) in Windows.
- Open MS Paint and select the Eraser tool.
- Search for and open On-Screen Keyboard (type “osk” in Start menu).
- Make sure NumLock is enabled on the on-screen keyboard.
- Press Ctrl + + using the On-Screen Keyboard to increase eraser size.
🎯 Final Thoughts
And that’s it! Now you know how to easily increase or decrease the size of the eraser tool in MS Paint using either a numeric keypad or the on-screen keyboard. This trick can save you tons of time and make your image editing much more efficient.
Try it out and let me know in the comments if it worked for you! 💬


Post a Comment